
Hello Creators!
Its been my only makeup thing since 9th grade- Nail Art. I was a total tomboy but that one thing which kept me attached to my feminine side the most are my 'NAILS'. From then I used to do all sort of crazy things with them..like painting them neon, making art on them, growing them long and I can't remember the number of times I have been scolded for it but I never stopped. Those were the times when nail art wasn't as popular as today but then there were not so many other things either- Things like digital era but see how popular is it today and so is my beloved NAIL ART. I always looked out to vent my creativity, so I took help of 2 things- Calligraphy and Nail Art Designs. Now, I am much older and hardly someone stops me from having or doing what I love to do, So I go full-fledged out and about it because if I was all about nails back then against so many prejudice why not today.
Working with crazy nail paint colours, using different nail shades to accentuate my hand features and pop of nail polish to make my ensemble look put together is now my thing. If I can do so much with nail paints/nail art and not be bored of it yet then I can't be more eager to find out more happy souls who share the same love as me for their nails.
With today's advancement in this field nail salons, nail tools and fancy nail art equipment are very popular but what to do if you are a busy bee or a broke bee like me(for the later), you can't afford to spend an hour in a salon or your hard earned money on it. Trust me, I have tried salon twice and those place are hell lot expensive and specially when you do the dishes by yourself...You can not be happy about spending all that cash. So I would suggest start with the basics for prep up if creativity is not your forte :D , I am sure you will get there slowly.
Manicure-
- Choose you basic manicure routine and prep your nails for the nail art as hon nobody likes those cuticles.
- Cut and file your nails according to your desire.
- Dip your hands in luke warm soap water(your regular body soap) for 5-10 mins. You can add 4-5 drops of coconut oil for nourishment and 1-2 drop of tea tree oil as disinfectant.
- Don't throw the water yet as you will need that washing off that dirt off during the process.
- Take tooth brush with soft bristles to gently push down your cuticles.
Or
You can buy the Nail Care Tool Kit - Click Here
- Once you are done, wash your hands thoroughly and moisturize them.
Preparation-
- Get all your required items at one place before starting the process of nail art as once nail paint is on, you hardly can move your hand around and pull things out drawer. Checklist -
-Nail Paints for your design
-Soft copy of a design you are going to follow
-Scotch Tape
-Scissors
-Nail Paint Remover + Cotton
-Toothpick (to make patterns for some designs)
-Top Coat
-Your favourite magazine or music to keep you busy till the time coats dry
Nail Art-
- Once you are all set, go ahead with your nail art and girls please give it some time to dry off as all your hard work will go down the drain if you don't have patience hence the magazine or music. :D
Some Glitter-Some Gold:So Here are 4 easy and simple nail art designs from my kitty for you pom poms :D

The Ombre Effect:

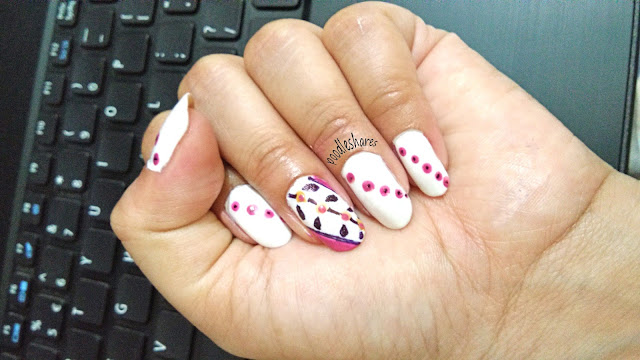
Some White Base Art:


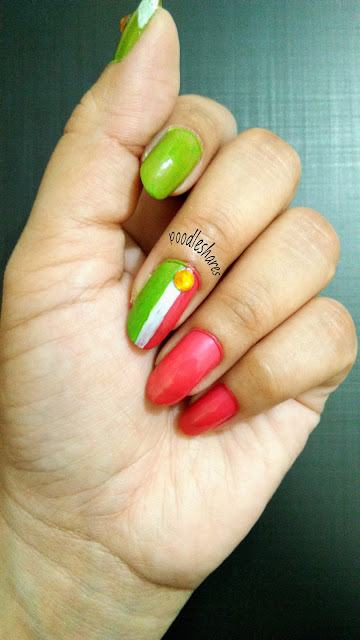
Bedazzled Pop of Colours:


I will be updating NAIL ART TUTORIALS on my YouTube channel from now onwards, so make sure to
Share your quirks and experiences regarding various creative outlets you have been attached to since as long as you can remember in the comments down below. I am always available to answer your query. ask me anything.
*-*
*-*


